Well I know it has been a few weeks since the last post and since no one is following I guess it doesn't matter, but I have come in some personal difficulty and have come out of retirement and gone to work for my oldest son on his construction crew helping to rebuild houses here in Panama City after the cat 5 hurricane Michael. So it may be a while until I return to working on my boat.
Until the next time,
Geoff
Sunday, June 16, 2019
Wednesday, May 15, 2019
More center case and board work.
Well I know it's been a little bit since I posted anything so here we go with some more work on the center case and board. I've done some gluing of the packers and cheek pieces and even the top case edges.
They look uneven in the picture but each side is ok just not exactly on top of the other but with the plastic separating them it's all good.
Each side is also screwed from the inside out with #10 x 1" stainless screws. After all is glued then a quick sanding on the inside of the case halves and then 2 coats of unthickened epoxy.
I started shaping the end of the board where the uphaul tackle will attach. I started by drawing out the proposed area to be shaped then started in with (as Geoff Kerr calls the wood eraser) right angle grinder with a 40 grit flapper disc. Took the wood down to the approximate thickness as deep as possible.
Then I got out the trim router and the 1/2" bit with top bearing, and CAREFULLY trimmed around the edge of the area leaving a slight ridge for the bearing to follow. Then in three passes cleared out the final area. touched it up with a little 60 grit sand paper by hand and voila! Ready to drill the appropriate sized hole for the uphaul shackle.
Lastly for this outing, drilling the pivot pin hole oversized. Plans call for a pivot pin of 20mm, I plan on using one just 3/4" sae size, only a couple of millimeters smaller, so a 1" overbore would be sufficient to allow for a 1/8" thick bushing of solid epoxy for the pivot pin to ride on. The case sides will be done the same way and using neoprene washers on either side to seal the hole against leaks.
That's all for now, so until next time,
Geoff
 |
| Port and Starb'd case sides packers and cheeks gluing. |
 |
| Another angle. |
 |
| The beginning of shaping the uphaul end of the center board. |
 |
| Next step, the router. |
 |
| Oversized pivot pin hole. |
That's all for now, so until next time,
Geoff
Monday, April 29, 2019
New addition to the multipurpose work station!
 |
| Multi-function work station! |
 |
| Wow, look at it work! |
After drilling for the four case through bolts I rough trimmed the forward end of the center board around the bottom corner where the pivot bolt will be and up where the lifting tackle will attach and laid it in to the port case side.
 |
| The center board and half of the case. |
 |
| Lifting lug and forward case end cap. |
 |
| Pivot point and forward end cap. |
 | |
| Just trying it out, the swing out that is. |
So, until next time,
Geoff
Thursday, April 25, 2019
Renewed focus
Well here we are again, back in the garage/boat shop. I did a lot of thinking in the last couple of days about my approach to this project and why it seems so disjointed. I still don't have an exact answer but I realize that I am quite inexorably the reason but I just can't explain it other than lack of focus. So with renewed focus I started by listing the individual actions that needed to be accomplished in the appropriate order they needed to be completed.
Like so many other builders I am big on enthusiasm but small on space. To that end I am having to rethink when each piece will be needed to be completed in timing with construction. Space being limited I have set aside the bottom panel and keelson for this moment and moved to the next piece to get installed. The centerboard case is the next item to be installed so it is the next item to get worked on to completion along with the centerboard itself.
So three days ago I epoxied the center board, still a rough piece at this point but at least it is available for fitting/clearance checking of the case.
So far the only thing since gluing the board up was to knock off the excess epoxy and any undesirables that might have tried to insert themselves into this build. Then on to the case sides and the rest of the fiddely bits, packers, doublers and supports.
Plans call for the seat risers and packers and doublers need to be screwed from the inside of the case as well as epoxied from the outside. Here are the packers, they double the case sides along the bottom of the sides where they meet the keelson. Visible also are the pilot holes for the seat risers already.
Also the doublers are piloted for the #10 screws and also the 1/4" thru bolts.
Next I worked on fitting the case end logs. At this point it is easy to lay the centerboard into the space and see just how much clearance is available. I noticed that there is very little room side to side for the board and if glassed it might not swing smoothly if at all. I am hoping that planing the board to clean it up and size it should reap the benefit of some more room without over sizing the case at all. I don't anticipate any trouble with the blade end of the board due to the extensive shaping needed. I may even gain some room by glassing the inside of the case before attaching the case end logs but I haven't decided if I will need to do that.
Laying out the pieces for the case sides, gives a chance for visual inspection. The stainless thru bolts, washers, locking nuts and stainless screws need to be purchased. Also need some of Russell Brown's recommended unwaxed paper mixing cups which are mysteriously unavailable locally so might need to order them from Duckworks. There are plenty of scrap pieces of wood laying around to make chisel sticks, fillet sticks and stirring sticks (straight sides and bottom edges for mixing properly).
Well the first of the month is only a few days away so there will soon be supplies to properly mix and apply epoxy. Finishing the shape of the center board itself remains. Still quite a bit of work ahead.
Until next time,
Geoff
Like so many other builders I am big on enthusiasm but small on space. To that end I am having to rethink when each piece will be needed to be completed in timing with construction. Space being limited I have set aside the bottom panel and keelson for this moment and moved to the next piece to get installed. The centerboard case is the next item to be installed so it is the next item to get worked on to completion along with the centerboard itself.
So three days ago I epoxied the center board, still a rough piece at this point but at least it is available for fitting/clearance checking of the case.
 |
| Just rough planing to knock off epoxy globs and such. |
 |
| Packers at the bottom of the case get piloted for screwing from the inside of the case sides. |
 |
| Here now are the doublers which also get screwed and glued. |
 |
| Fitting the case end logs. |
 |
| Enough pieces to fit one side of the case dry fitted. |
Well the first of the month is only a few days away so there will soon be supplies to properly mix and apply epoxy. Finishing the shape of the center board itself remains. Still quite a bit of work ahead.
Until next time,
Geoff
Wednesday, April 24, 2019
Still here and pluggin' away.
 |
| A foil shaped router jig for centerboard. |
 |
| Jig in place, just make sure you get it facing the right direction. |
 |
| Scarfing station for bottom panel. Still a good way to go. |

 |
| What the heck is going on here? |
 |
| Looks like slip sliding away! |
 |
| Guess I need to work on my scarfing skills some more. |
 |
| Dad's old saw. |
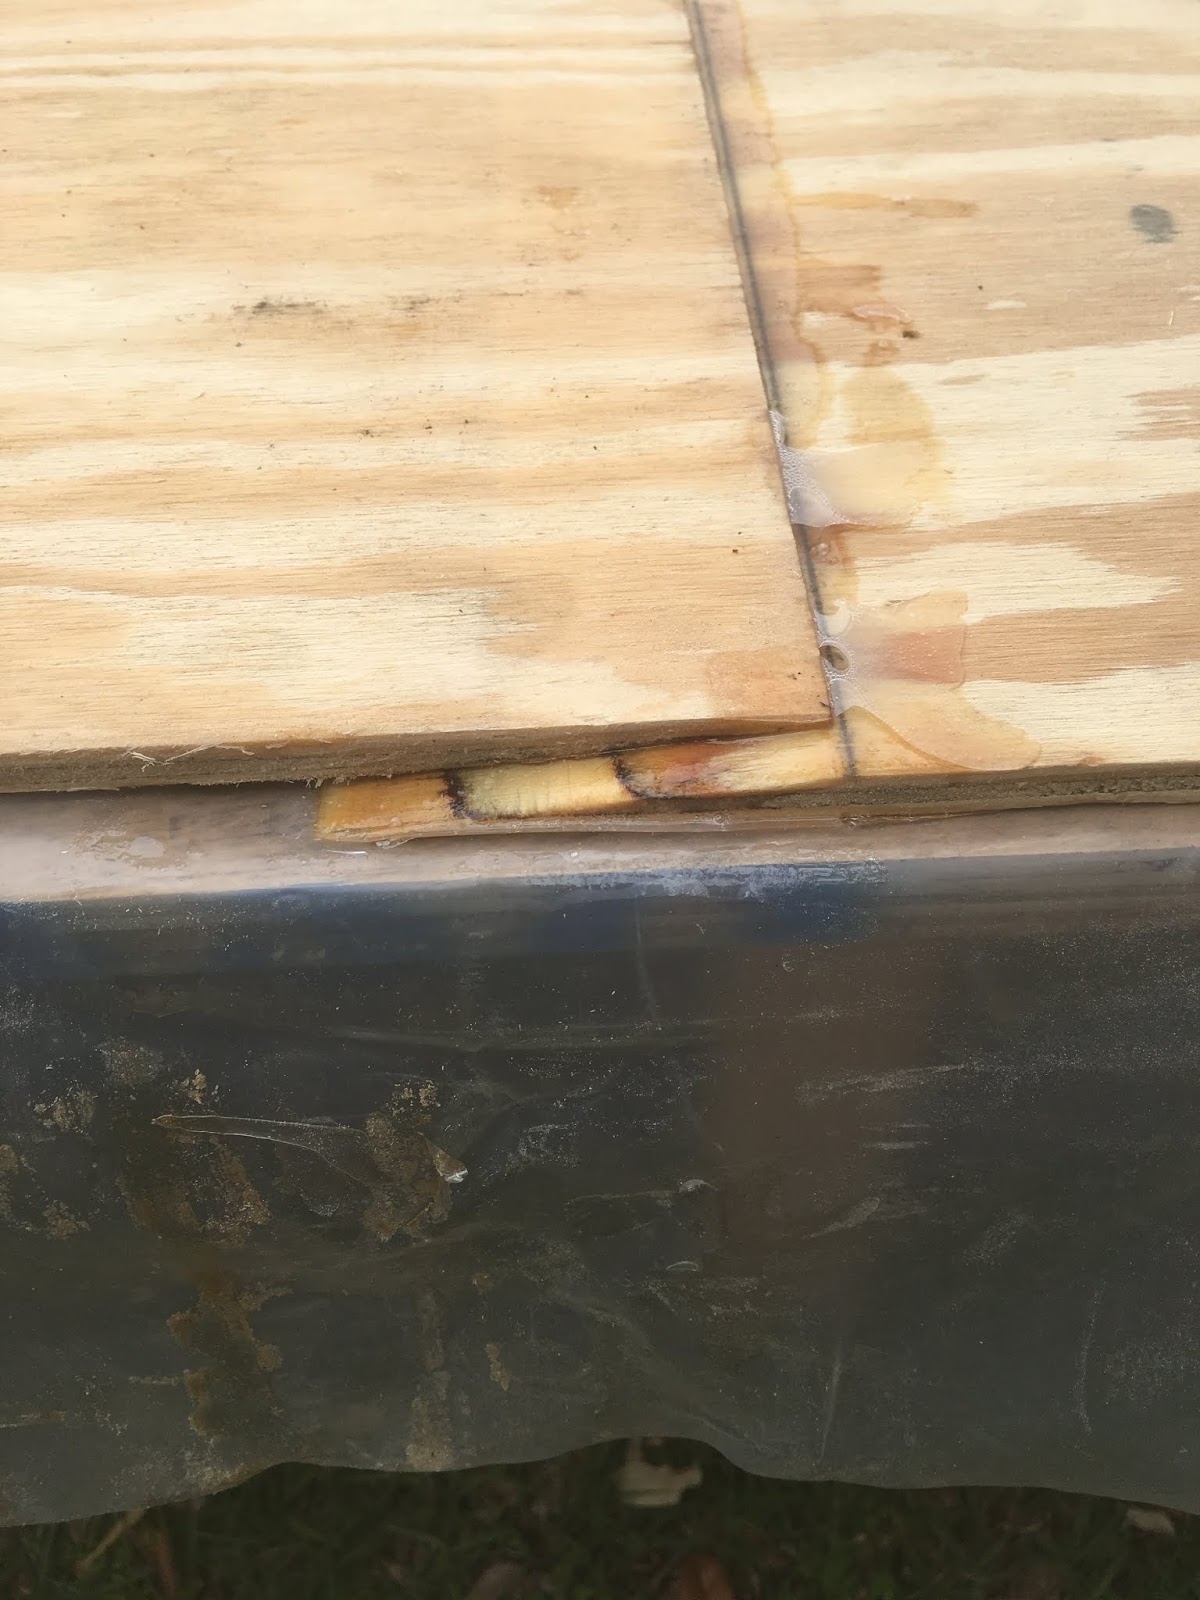
Other experiments I tried the other day was gluing the center board stack of boards and the stem and its doublers. They both seem to have come out ok.
 | |
| The clamp side of the centerboard against the plastic sheeting. |
 |
| The top side of the board. |
 |
| In the clamps, 5 of then to be exact. |
 |
| Closeup of the lifting portion. Still needs some work yet. |
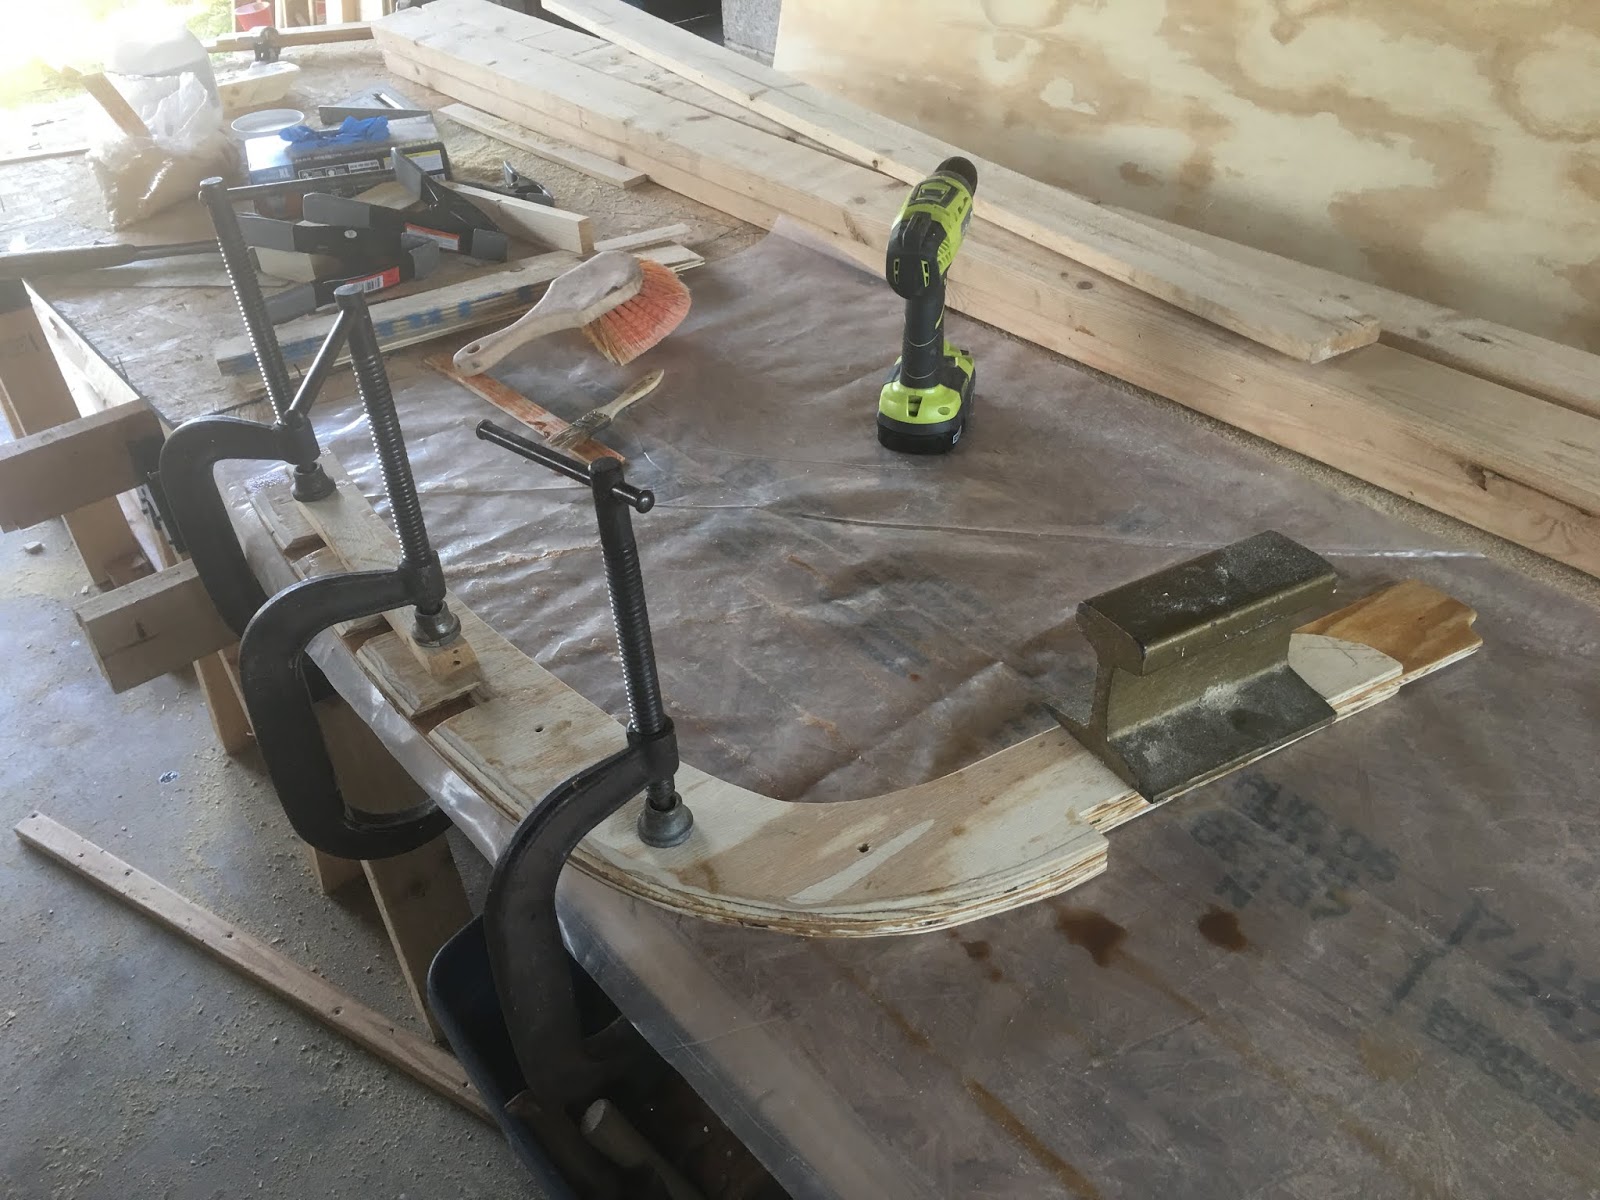 |
| Yes that is a piece of light gauge railroad track. (about 20 or so pounds, approx. 5inches long) |
 |
| Now gone is the right hand curve in the forward stem portion |
 |
| The bottom portion of the stem still straight as before. |
 |
| Still wrapped in the plastic bags they were shipped in the protect against leaks. |
 | |
| Learn to mix epoxy carefully. |
Until next time, a wiser and much humbler,
Geoff
Tuesday, April 16, 2019
Back at it again!
Well as the title supposes, I'm back at it again. Working on building the parts and pieces to assemble a John Welsford Navigator. Just in case that last bout with doubt had given you cause to wonder if I had given up or was ready to through in the towel and try another plan. I must admit Mr. Oughtred's designs are quite alluring. But no, I have not succumbed to the siren call of another boat.
I have though, gone completely off the rails so to speak, and actually worked on the building frame. I am nowhere near ready for that and now that it's up I have nowhere to put it that is under cover and out of the weather until there is room for it in the garage! So it stays right where it is for now.
Since it was such a nice day, I decided to use it as an alternative work station. So I jumped on to the stem and doublers to ready them for gluing.
Well there's that four letter word, glue! I'm not really sure I am quite ready for gluing but I guess I have to start sooner or later. This will be my very first foray into the world of epoxy. Wish me luck, I guess.
Until next time,
Geoff
I have though, gone completely off the rails so to speak, and actually worked on the building frame. I am nowhere near ready for that and now that it's up I have nowhere to put it that is under cover and out of the weather until there is room for it in the garage! So it stays right where it is for now.
 |
| Building frame. |
 |
| Stem doublers clamped together without the center section for work. |
 |
| Close up of just the doublers and the beveled landing for the stringers. |
 |
| Now with the center piece between the doublers. |
 |
| Long shot all three pieces dry assembled. |
 |
| And just for effect, a head on view. |
 |
| I don't know if you can see the stringer landings very well but here is the stem with temporary screws to hold it together ready for gluing. |
Until next time,
Geoff
Sunday, April 14, 2019
Honestly now I think I'm fed up with fiddley bits
Well maybe not quite yet but it sure feels like it's getting there. Sorry no pictures this time left the phone/camera in the truck and didn't really feel like photographing anything. I didn't really seem to want to be there this last time (was actually Wednesday this week). I couldn't really concentrate and decide what to do while there. I actually started to put together the building frame, even though I'm nowhere near ready for it, and then when I got home realized that I used the wrong measurements to do it. So now the next time I go back I've got to take it all apart and redo it using the correct dimensions. The spacing for the bottom braces are different from the station (frames/bulkheads). And you guessed it I used the frame spacing instead of the bottom braces. It will come apart very hard and may well not be reusable, as I ran out of coated deck screws (which can be unscrewed easily) I filled in with coated (glued, which don't come out so easily) sinkers as they are called in the framing game. Also sometimes known as green toe nails to the new guy on the crew. ("Hey newbie, bring me a box of green toe nails! Yeah, they're right next to the board stretcher!") My son heard a lot of that stuff when he used to frame houses years ago.
I guess this is just a slump of sorts and hope it doesn't last too long. So I've gone to Off Center Harbor to watch some boat building videos to help jump start me again to get going on MY boat. Trouble is the Caledonia Yawl that Geoff Kerr keeps building is beginning to look really good. And construction "looks" to be a lot simpler. Of course it's a different style boat, open double ended, bigger too! It's amazing to watch him lift the completed hull off the building frame by himself, 200 lbs approx. weight, to flip it over.
However in all the videos of Caledonia and Ness yawls and Navigators, the Navigators seem to sail more upright in similar winds. Not that I'm saying that the other boats don't or can't sail upright it's just that I see those heeled more frequently and the skipper and/or crew hiking out more than the skipper and/or crew of Navigators. I guess those pretty lines of Iain Oughtred's are very captivating. I sure would like to see more videos of Navigators either sailing in company with other Navigators or just see them from other boats to watch them sail in the same conditions. Of course it wouldn't hurt to have Geoff Kerr build a John Welsford Navigator for an Off Center Harbor video series.
Just saying, until next time,
Geoff
Friday, March 29, 2019
More fiddling about with bits
 |
| It's a 10" table saw and a 3" belt sander, |
 |
| but wait, it's also a 10' compound miter saw! What a country! |
 |
| Transom with solid wood doublers. |
 |
| Multi-tasking work station is also a jigsaw center. |

 |
| Fitted out just not glued up yet. |
 |
| Next up bulkhead #1 |
 |
| All decked out. |
 |
| Hatches and mast box all sharing the same space. |
 |
| The seat riser shown here will actually attach to the aft side of the bulkhead. |
 |
| Setting it up again to have another look. |
 |
| Stem, bulkhead #1, bulkhead #2, frame #3, #4 and the center board case. |
So until next time,
Geoff
Subscribe to:
Comments (Atom)