Tuesday, May 19, 2020

"be afraid, be very afraid!"

Well here we are May 18, 2020, and of course you all know what has been going on for the last two months, panic and fear over the dreaded corona virus #19. It really amazes me how the liberal politicians and media along with establishment organizations like CDC and the World Health Organization (WHO?) have been able to through this almost entire country into chaos over the flu. And just when did they make this W.H.O. and just what is their mandate and just who is watching over them? Obviously they are not watching very closely if we've been put through all these shenanigins over another seasonal flu. You know don't you, the ALL flues are a corona virus!

Oh well, you're not here to get educated on flues and government agencies, so let's get to what's been going on in the boat world. My boat world that is. When all the hubub broke out and they started yelling that anyone over 65 was going to get this thing and die, of course my sweet wife was concerned that I might be at elevated risk. I am as it is 68 now and I don't want her to be worried so I was obedient and stopped working back in March. So in the meantime I've spent many hours watching Off Center Harbor and Geoff Kerr building a Caledonia yawl, step by step (over and over). I don't mean to hide that I quite like it very much and Geoff Kerr makes it look so easy. So much so that I ordered a set of plans from Iain Oughtred for a Tirrik. Which would be about the comparable model to a Navigator. At 15'10" OAL and 5'4" beam with a balanced lug main of 97sqft and a sprit boomed mizzen of 17sqft, both boats are equal sail area wise. Only one transomed and the other double ended. One partially decked and the other open or partially decked, they seem pretty much the same. Both claim to sail well in light air as well in heavy air. Both well known for their seakeeping ability and their design pedigree, ancestry and  plethora of examples to back it all up.

So what to do? Abandon the one started for the one not? Well it comes down to interchangeability of parts. I know you are saying "What???" I had started a Family Skiff by Jim Michalak simply because I thought it would be a simpler build and less expensive and I could be sailing sooner. Silly me that I would think such a thing, really?? Well I was thinking of the cost of premium plywood which at this time is sort of out of my realm, and I had started the Navigator with the quote from John Welsford resembling something like " the less money you spend building you boat, the more you will enjoy it" . So the Navigator build was started with regular lumber yard (read "big box store") BCX plywood sanded both sides. But in a fit of frustration over the constant bending due to the humidity I thru in the towel and thru up my hands and said, "Enough! I can't deal with this any longer!". Enter the Family Skiff which I have had plans for from awhile ago.

Picking up my copy of Roger Barnes book "The Dinghy Cruising Companion", he mentions the Navigator as one of seven or so boats well suited to dinghy cruising. Lo and behold what's that rolled up and standing in the corner of the room next to the lamp table? Could it be, is it, yes it is, my set of Navigator plans. This obviously must be some kind of sign or divine direction, ya think? So the plan is to restart the Navigator but using the premium ply for the hull planking and bottom to start with but using the frames and such already built. Oh yeah the interchangeability part, I had already ordered the sail for Family Skiff and, you guessed it, it's the same 97sqft and only off in shape by a few inches in one or two places. So pretty much the same sail with pretty much the same center of area location as the Navigator. Should work ok.

So no pictures today and it may be a while before assembly can start, we'll see how it goes.

Until next time

Geoff

Sunday, June 16, 2019

Where 'o' where has the little dog gone?

Well I know it has been a few weeks since the last post and since no one is following I guess it doesn't matter, but I have come in some personal difficulty and have come out of retirement and gone to work for my oldest son on his construction crew helping to rebuild houses here in Panama City after the cat 5 hurricane Michael. So it may be a while until I return to working on my boat.

Until the next time,

Geoff

Wednesday, May 15, 2019

More center case and board work.

Well I know it's been a little bit since I posted anything so here we go with some more work on the center case and board. I've done some gluing of the packers and cheek pieces and even the top case edges.
Port and Starb'd case sides packers and cheeks gluing.
 They look uneven in the picture but each side is ok just not exactly on top of the other but with the plastic separating them it's all good.
Another angle.
Each side is also screwed from the inside out with #10 x 1" stainless screws. After all is glued then a quick sanding on the inside of the case halves and then 2 coats of unthickened epoxy.
The beginning of shaping the uphaul end of the center board.
I started shaping the end of the board where the uphaul tackle will attach. I started by drawing out the proposed area to be shaped then started in with (as Geoff Kerr calls the wood eraser) right angle grinder with a 40 grit flapper disc. Took the wood down to the approximate thickness as deep as possible.
Next step, the router.
Then I got out the trim router and the 1/2" bit with top bearing, and CAREFULLY trimmed around the edge of the area leaving a slight ridge for the bearing to follow. Then in three passes cleared out the final area. touched it up with a little 60 grit sand paper by hand and voila! Ready to drill the appropriate sized hole for the uphaul shackle.
Oversized pivot pin hole.
Lastly for this outing, drilling the pivot pin hole oversized. Plans call for a pivot pin of 20mm, I plan on using one just 3/4" sae size, only a couple of millimeters smaller, so a 1" overbore would be sufficient to allow for a 1/8" thick bushing of solid epoxy for the pivot pin to ride on. The case sides will be done the same way and using neoprene washers on either side to seal the hole against leaks.

That's all for now, so until next time,

Geoff

Monday, April 29, 2019

New addition to the multipurpose work station!

Well if this don't beat all! Not only is my multipurpose work station a table saw, sanding station, compound miter station and a jig saw (I'm sure I've left something out), it's also a drill press!! I'm telling ya man, what a country this America. When an average guy like me can own such a wonderful and versatile tool, what else is left?? So here it is,
Multi-function work station!
and here it is in action! Wow, look at it go!!
Wow, look at it work!
Here it is drilling the center case through bolt holes. There was just a small job of leveling the case to the drill quill and drill away. Nothing has been glued yet but the case sides and end caps are lined up and well clamped so that the sides and ends will all line up when it's time to glue. Right now it looks like the end of this week or early next week will be time for gluing.

After drilling for the four case through bolts I rough trimmed the forward end of the center board around the bottom corner where the pivot bolt will be and up where the lifting tackle will attach and laid it in to the port case side.
The center board and half of the case.
The board looks to have plenty of clearance top to bottom and end to end but it's a little close side to side. I still have to plane down the board since it's been glued so I am hoping there will end up with adequate room by the time I'm done. Here's a couple more shots of the board in the case half.
Lifting lug and forward case end cap.
Pivot point and forward end cap.
Just trying it out, the swing out that is.
 The first of the month is coming and so will the resupply of boat building paraphernalia. I plan on bringing about a hundred or so #10x1" stainless steel screws to be able to permanently join what ever I can. Along with a bunch of 10 or 12 oz unwaxed paper cups and the four center case through bolts and the center board pivot bolt. I'm hoping that will keep me busy for at least the rest of the month.

So, until next time,

Geoff

Thursday, April 25, 2019

Renewed focus

Well here we are again, back in the garage/boat shop. I did a lot of thinking in the last couple of days about my approach to this project and why it seems so disjointed. I still don't have an exact answer but I realize that I am quite inexorably the reason but I just can't explain it other than lack of focus. So with renewed focus I started by listing the individual actions that needed to be accomplished in the appropriate order they needed to be completed.

Like so many other builders I am big on enthusiasm but small on space. To that end I am having to rethink when each piece will be needed to be completed in timing with construction. Space being limited I have set aside the bottom panel and keelson for this moment and moved to the next piece to get installed. The centerboard case is the next item to be installed so it is the next item to get worked on to completion along with the centerboard itself.

So three days ago I epoxied the center board, still a rough piece at this point but at least it is available for fitting/clearance checking of the case.
Just rough planing to knock off epoxy globs and such.
  So far the only thing since gluing the board up was to knock off the excess epoxy and any undesirables that might have tried to insert themselves into this build. Then on to the case sides and the rest of the fiddely bits, packers, doublers and supports.
Packers at the bottom of the case get piloted for screwing from the inside of the case sides.
Plans call for the seat risers and packers and doublers need to be screwed from the inside of the case as well as epoxied from the outside. Here are the packers, they double the case sides along the bottom of the sides where they meet the keelson. Visible also are the pilot holes for the seat risers already.
Here now are the doublers which also get screwed and glued.
Also the doublers are piloted for the #10 screws and also the 1/4" thru bolts.
Fitting the case end logs.
Next I worked on fitting the case end logs. At this point it is easy to lay the centerboard into the space and see just how much clearance is available. I noticed that there is very little room side to side for the board and if glassed it might not swing smoothly if at all. I am hoping that planing the board to clean it up and size it should reap the benefit of some more room without over sizing the case at all. I don't anticipate any trouble with the blade end of the board due to the extensive shaping needed. I may even gain some room by glassing the inside of the case before attaching the case end logs but I haven't decided if I will need to do that.
Enough pieces to fit one side of the case dry fitted.
Laying out the pieces for the case sides, gives a chance for visual inspection. The stainless thru bolts, washers, locking nuts and stainless screws need to be purchased. Also need some of Russell Brown's recommended unwaxed paper mixing cups which are mysteriously unavailable locally so might need to order them from Duckworks. There are plenty of scrap pieces of wood laying around to make chisel sticks, fillet sticks and stirring sticks (straight sides and bottom edges for mixing properly).

Well the first of the month is only a few days away so there will soon be supplies to properly mix and apply epoxy. Finishing the shape of the center board itself remains. Still quite a bit of work ahead.

Until next time,

Geoff

Wednesday, April 24, 2019

Still here and pluggin' away.

Sorry for not keeping up but I've been studying other peoples builds and criticizing my own then fighting discouragement to keep going. So here's what has been going on, last time I allowed myself to get side tracked by the building frame when I wasn't ready for it. So at this time I had acquired a couple sheets of exterior 3/4" ply to use for the building frame risers, and yes I am aware that it should not take two full sheets of plywood to make the risers but they were offered at no cost and the man helped me load them into my old pickup. Old attitudes from the railroad keep coming back to haunt me, "if it's for free, it's for me", hard to turn down free wood. So admitting to myself that I really shouldn't put the risers on the frame rails just yet, I decided that I'll just layout the 3/4" ply on the frame and enjoy an outdoor work area. And what more appropriate job for a 4'x16' table than to create the scarf joint for the bottom panel. But before I got into that mess, knowing that I don't need all that heavy ply, I thought that I would take this opportunity to make a router jig for shaping the centerboard.
A foil shaped router jig for centerboard.
I had made a tracing of the foil shape off the plan sheet and just laid it on a corner of the 3/4" sheet and marked through with an awl to commit the pattern to the wood. Then just "connect the dots" and cut it out and trim. Then just trace the freshly cut and trimmed shape onto the ply and repeat then the  next thing you know you've got a jig!
Jig in place, just make sure you get it facing the right direction.
So anyway back at the alternative work area, I remembered what I had originally started to do and dragged out the two 3/8" ply sheets for the bottom panel and laid them out on the building frame/work table. Lined them up and marked out 3" on both sheets and adjusted the over lap and set an upper guide and clamped it all down. Then started first with my belt sander then my old jack plane and then back to the sander this time with a new belt.
Scarfing station for bottom panel. Still a good way to go.
 Meanwhile back in the garage, I had started eyeing the epoxy stuff and wondering when it would be time to start that. I know what Russell Brown and Geoff Kerr had said about making sure you have everything ready before you start, so on and so forth. Well I went ahead and jumped in without being ready and boy did I learn that lesson.
Looks good so far, but wait a minute,
What the heck is going on here?
Looks like slip sliding away!
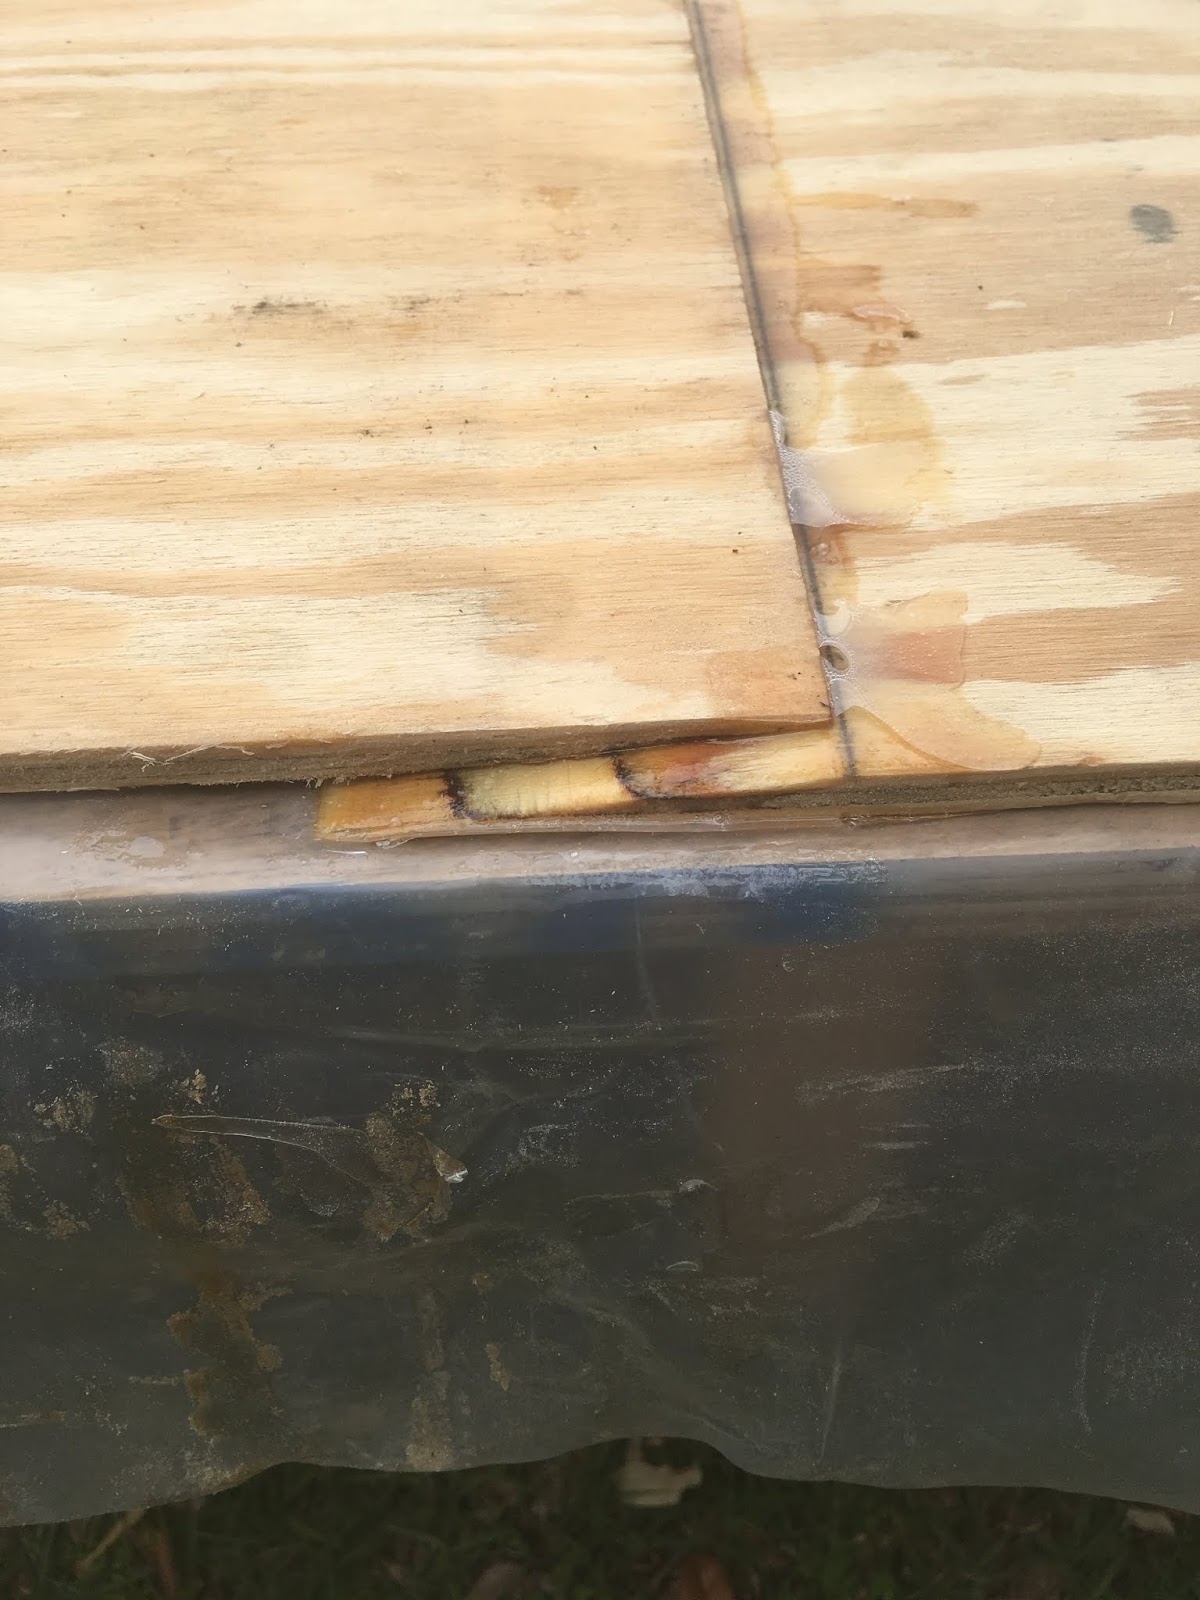
It seems that when I lined it up and tightened down the clamp the panels, or rather the top panel slipped off to one side. Note to self, make sure both panels are securely located before adding clamps. That's not so bad, it gets worse.
Guess I need to work on my scarfing skills some more.
This is the under side of the same joint. I just marked off on either side of the defective joint and cut it out. It didn't look too bad from the top but after seeing the underneath, it was just a slap in my face over the shoddy workmanship I was willing to try to get by with. Shame on me. I don't understand why I seem to be in such a hurry to get anything done. This isn't a weekend project and I know it up front.
Dad's old saw.
By the way here is a shot of the circular saw my dad used to use when I was about 11 or 12, I'll be 68 this august. It is all aluminum, the only plastic is the baklight knob on the body for a guide handle. Honestly a seriously heavy saw.

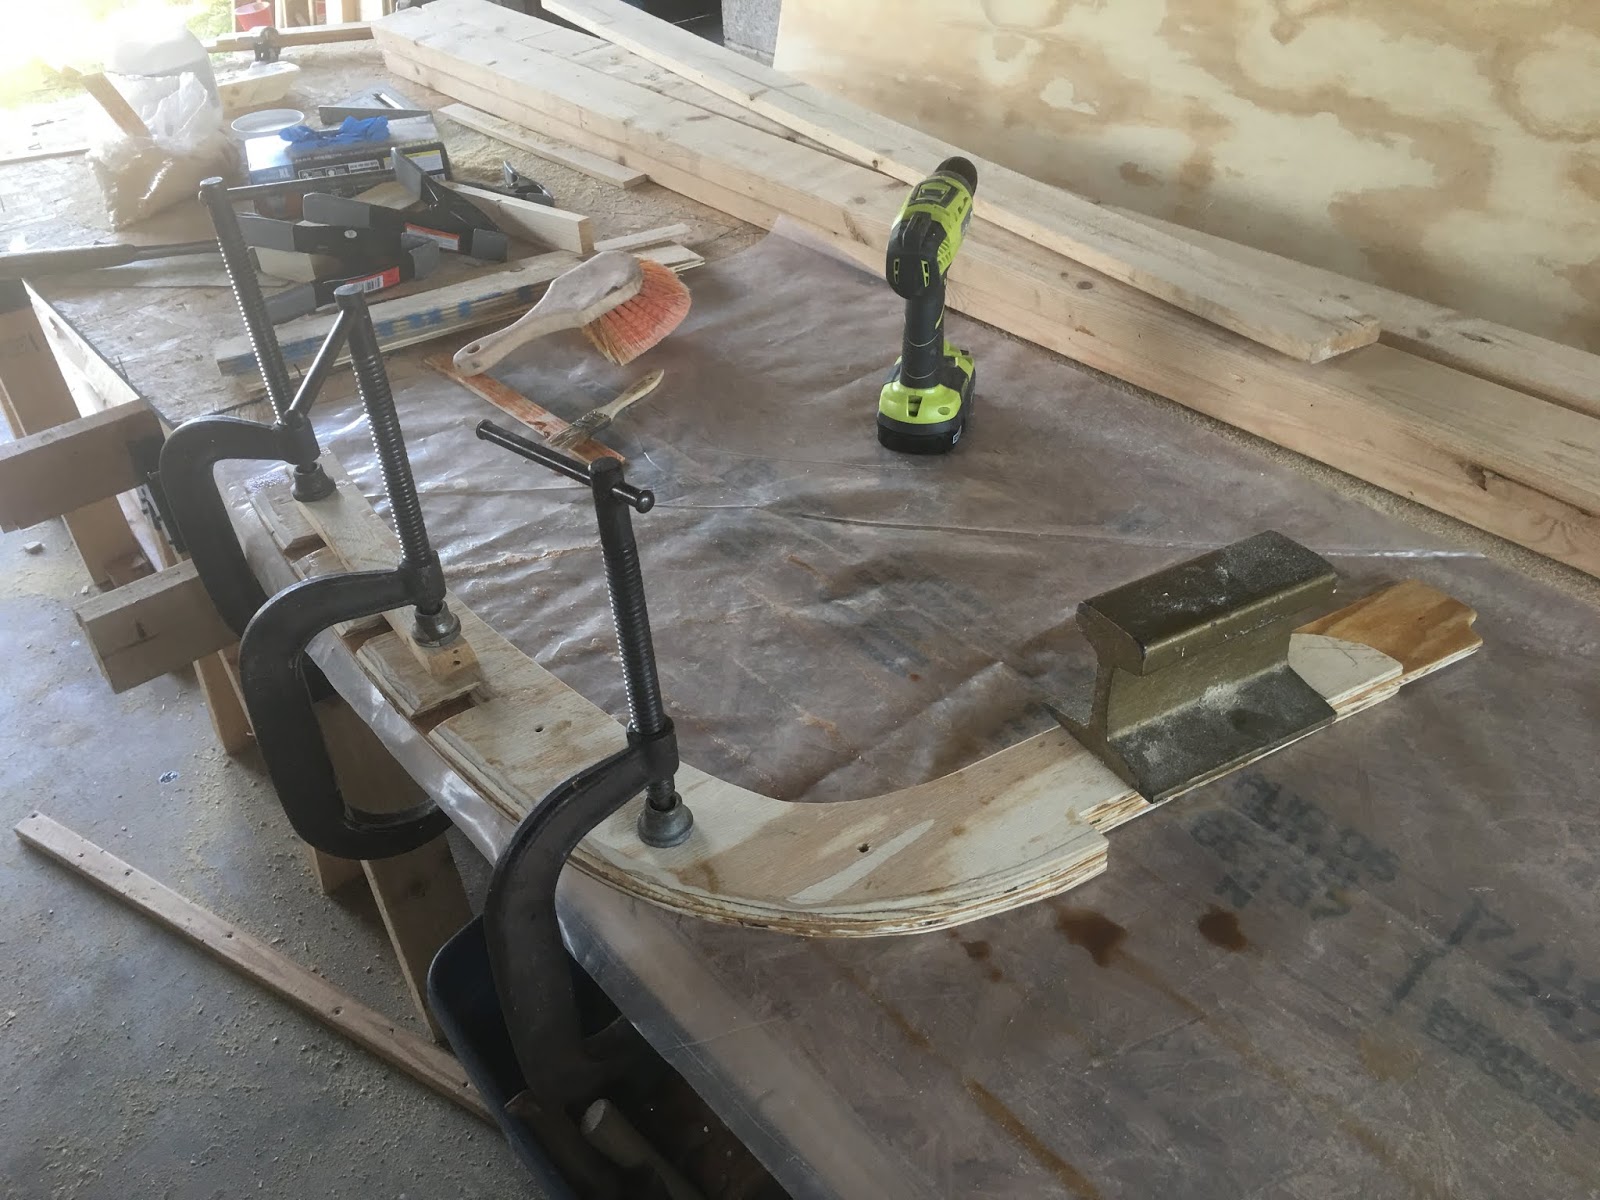
Other experiments I tried the other day was gluing the center board stack of boards and the stem and its doublers. They both seem to have come out ok.
The clamp side of the centerboard against the plastic sheeting.
The top side of the board.
In the clamps, 5 of then to be exact.
Closeup of the lifting portion. Still needs some work yet.
Also the stem and doublers.
Yes that is a piece of light gauge railroad track. (about 20 or so pounds, approx. 5inches long)
Undocumented before but with a slight curve in the leading edge portion of the stem, now after gluing miraculously no longer curved except where specified.
Now gone is the right hand curve in the forward stem portion

The bottom portion of the stem still straight as before.
The epoxy I'm using is RAKA from DuckworksBBS.com. I originally bought the deluxe package for building Jim Michalaks Piccup Pram but later decided to go ahead with the Navigator after all it is the boat that started all this for me. The kit contains 2 gals resin, 1 gal hardener, two rolls of 6oz fiberglass tape 4" wide, two yards of 6oz cloth, 5lbs wood flourand a few oz's of fumed silica. I chose to get the hardener half and half, fast and slow, not knowing how the Florida heat will affect cure times.
Still wrapped in the plastic bags they were shipped in the protect against leaks.
I also ordered three pumps, one for resin (full shot) and two for the hardener (half shot), one each so not to contaminate between slow and fast. Being as how it is a 2:1 ratio mixing.
Learn to mix epoxy carefully.
This is what an epoxy splash on your cotton t-shirt that doesn't "appear" to be fully mixed looks like after being washed and it comes out of the dryer. At first I thought is was a little lizard. (We have tons these of little lizards all over the place here. Harmless just not very people friendly).

Until next time, a wiser and much humbler,

Geoff


Tuesday, April 16, 2019

Back at it again!

Well as the title supposes, I'm back at it again. Working on building the parts and pieces to assemble a John Welsford Navigator. Just in case that last bout with doubt had given you cause to wonder if I had given up or was ready to through in the towel and try another plan. I must admit Mr. Oughtred's designs are quite alluring. But no, I have not succumbed to the siren call of another boat.

I have though, gone completely off the rails so to speak, and actually worked on the building frame. I am nowhere near ready for that and now that it's up I have nowhere to put it that is under cover and out of the weather until there is room for it in the garage! So it stays right where it is for now.
Building frame.
Since it was such a nice day, I decided to use it as an alternative work station. So I jumped on to the stem and doublers to ready them for gluing.
Stem doublers clamped together without the center section for work.
Close up of just the doublers and the beveled landing for the stringers.
Now with the center piece between the doublers.
Long shot all three pieces dry assembled.
And just for effect, a head on view.
I don't know if you can see the stringer landings very well but here is the stem with temporary screws to hold it together ready for gluing.
Well there's that four letter word, glue! I'm not really sure I am quite ready for gluing but I guess I have to start sooner or later. This will be my very first foray into the world of epoxy. Wish me luck, I guess.

Until next time,

Geoff